User guide
Lectunote is a tool for taking personal study notes while watching courses you are enrolled in, and summarizing them with AI. This page walks through each feature in the order it appears in the extension popup, with screenshots, and ends with where your data is stored and the personal-use rules.
Current status
Lectunote is being prepared for Chrome Web Store review and has not been publicly released. It cannot be installed before launch; email [email protected] if you would like a launch notification.
1. Getting started — install and sign in with Google
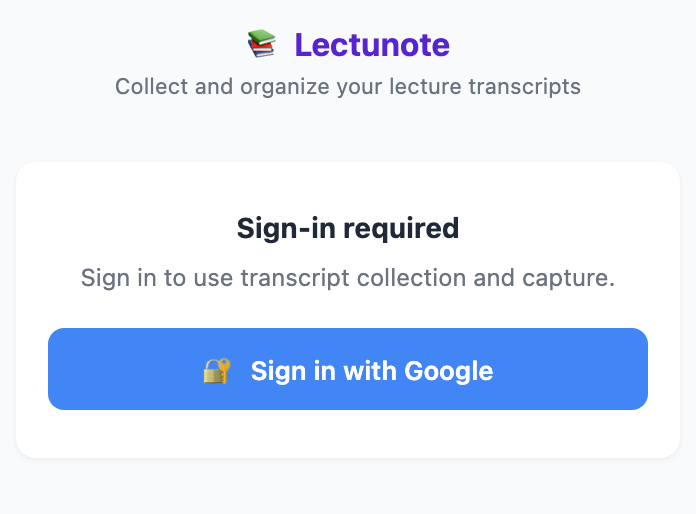
After installing the extension, open a Udemy lecture page (the address continues with /learn/lecture/) and click the Lectunote icon in the toolbar. The popup first shows a sign-in card; once you sign in with your Google account, the feature menu appears.
- Sign-in is used only to manage your credit balance and AI-notes usage history. Your Udemy account is never touched.
- New accounts receive 1,000 trial credits (1 credit = ₩1) so you can try AI notes right away; a typical lecture costs around 20 credits.
- If you use it often, pin Lectunote from the puzzle-piece icon in the Chrome toolbar.
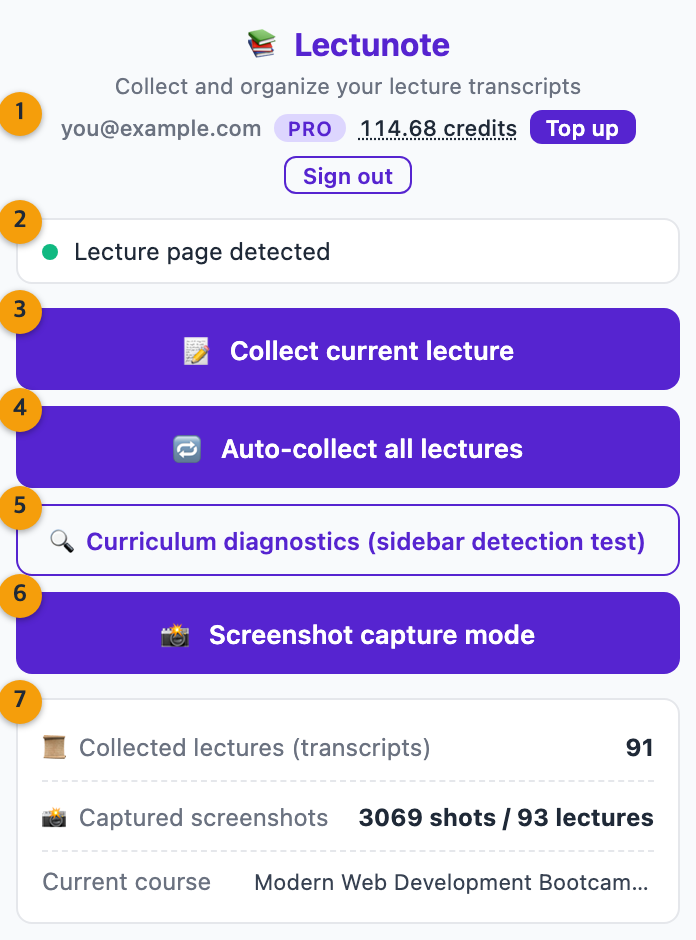
- 1Account bar — email, plan, credit balance (click for history), Top up, Sign out
- 2Page status — whether the current tab is a lecture page. Green means every feature is available
- 3Collect current lecture
- 4Auto-collect all lectures
- 5Curriculum diagnostics
- 6Screenshot capture mode
- 7Collection status — lectures collected, screenshots captured, current course
2. Page status
The status card at the top of the popup tells you what kind of page the current tab is, and enables or disables the buttons accordingly.
- Green — a lecture (video) page. Both collection and capture are available.
- Yellow — a course page that is not a video lecture (quiz, resources, and so on), or the lecture page needs a reload. Follow the message shown.
- On a tab that is not Udemy the buttons are disabled. Open the popup again from a lecture tab.
3. Collect current lecture
Reads the transcript of the lecture you are watching, together with its place in the curriculum (section, lecture number, title), and saves it as the study note for that lecture. Notes accumulate per lecture in browser storage, and the 'Collected lectures' count in the popup goes up.
- If the transcript panel in the Udemy player is closed, the extension opens it to read. When done, the popup shows 'Collected (lecture N): title'.
- Collecting the same lecture again overwrites the previous result. If a lecture was saved as number 0, click again from that lecture's page.
- Lectures without a transcript have nothing to collect and are skipped.
4. Auto-collect all lectures
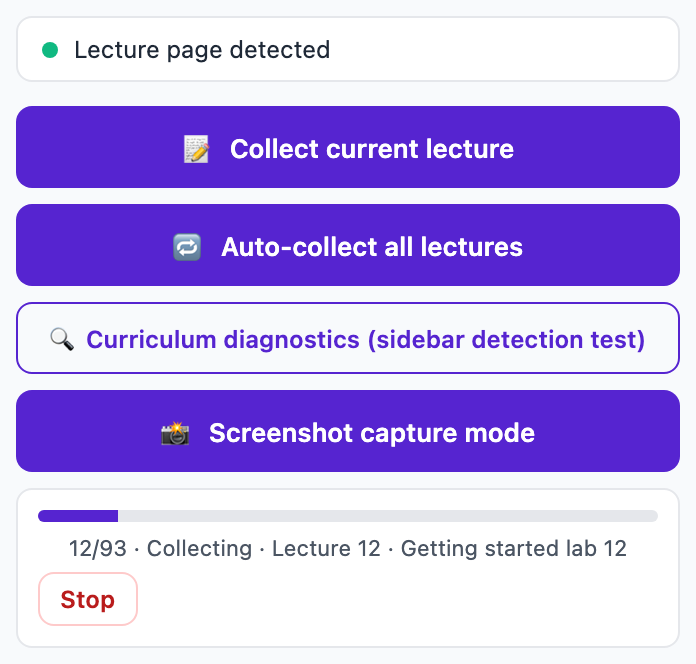
Moves from lecture 1 to the last lecture of the course in order, repeating 'Collect current lecture' on each. The progress panel cycles through 'Navigating → Collecting → Saved', and you can stop at any time with 'Stop'.
- Leave that tab alone while auto-collection runs. Navigating away or closing the tab interrupts it. Working in other tabs is fine.
- Lectures already collected are skipped automatically, so stopping and restarting does not repeat from the beginning.
- If a page change is slow it waits up to 30 seconds and retries up to 3 times. If a lecture still fails, the reason is shown in the status card.
5. Curriculum diagnostics
A check tool for when Udemy's page layout changes and the sidebar (curriculum) is no longer recognized. It reports in the popup how many section and lecture items were found and whether the transcript button is visible. Run it first when auto-collection jumps to the wrong lecture or lecture numbers look wrong; sending the report to [email protected] helps us fix it. It stores and transmits nothing.
6. Screenshot capture mode
Opens a separate window that shows the lecture video and captures the screen at a fixed interval of video time, pairing each capture with the transcript at that moment in a timeline. Useful for reviewing lectures heavy in code or slides. Captured images stay on your computer and are never sent to a server.
- The interval is measured in video time, not wall-clock time: at 4× speed you still get one capture every 20 seconds of video.
- At 10× and above a warning notes that transcript matching may become inaccurate. 4–6× is recommended.
- Some lectures are protected with DRM (Widevine L1) and the video shows only as a black screen. Capture cannot be used there; use transcript collection only.
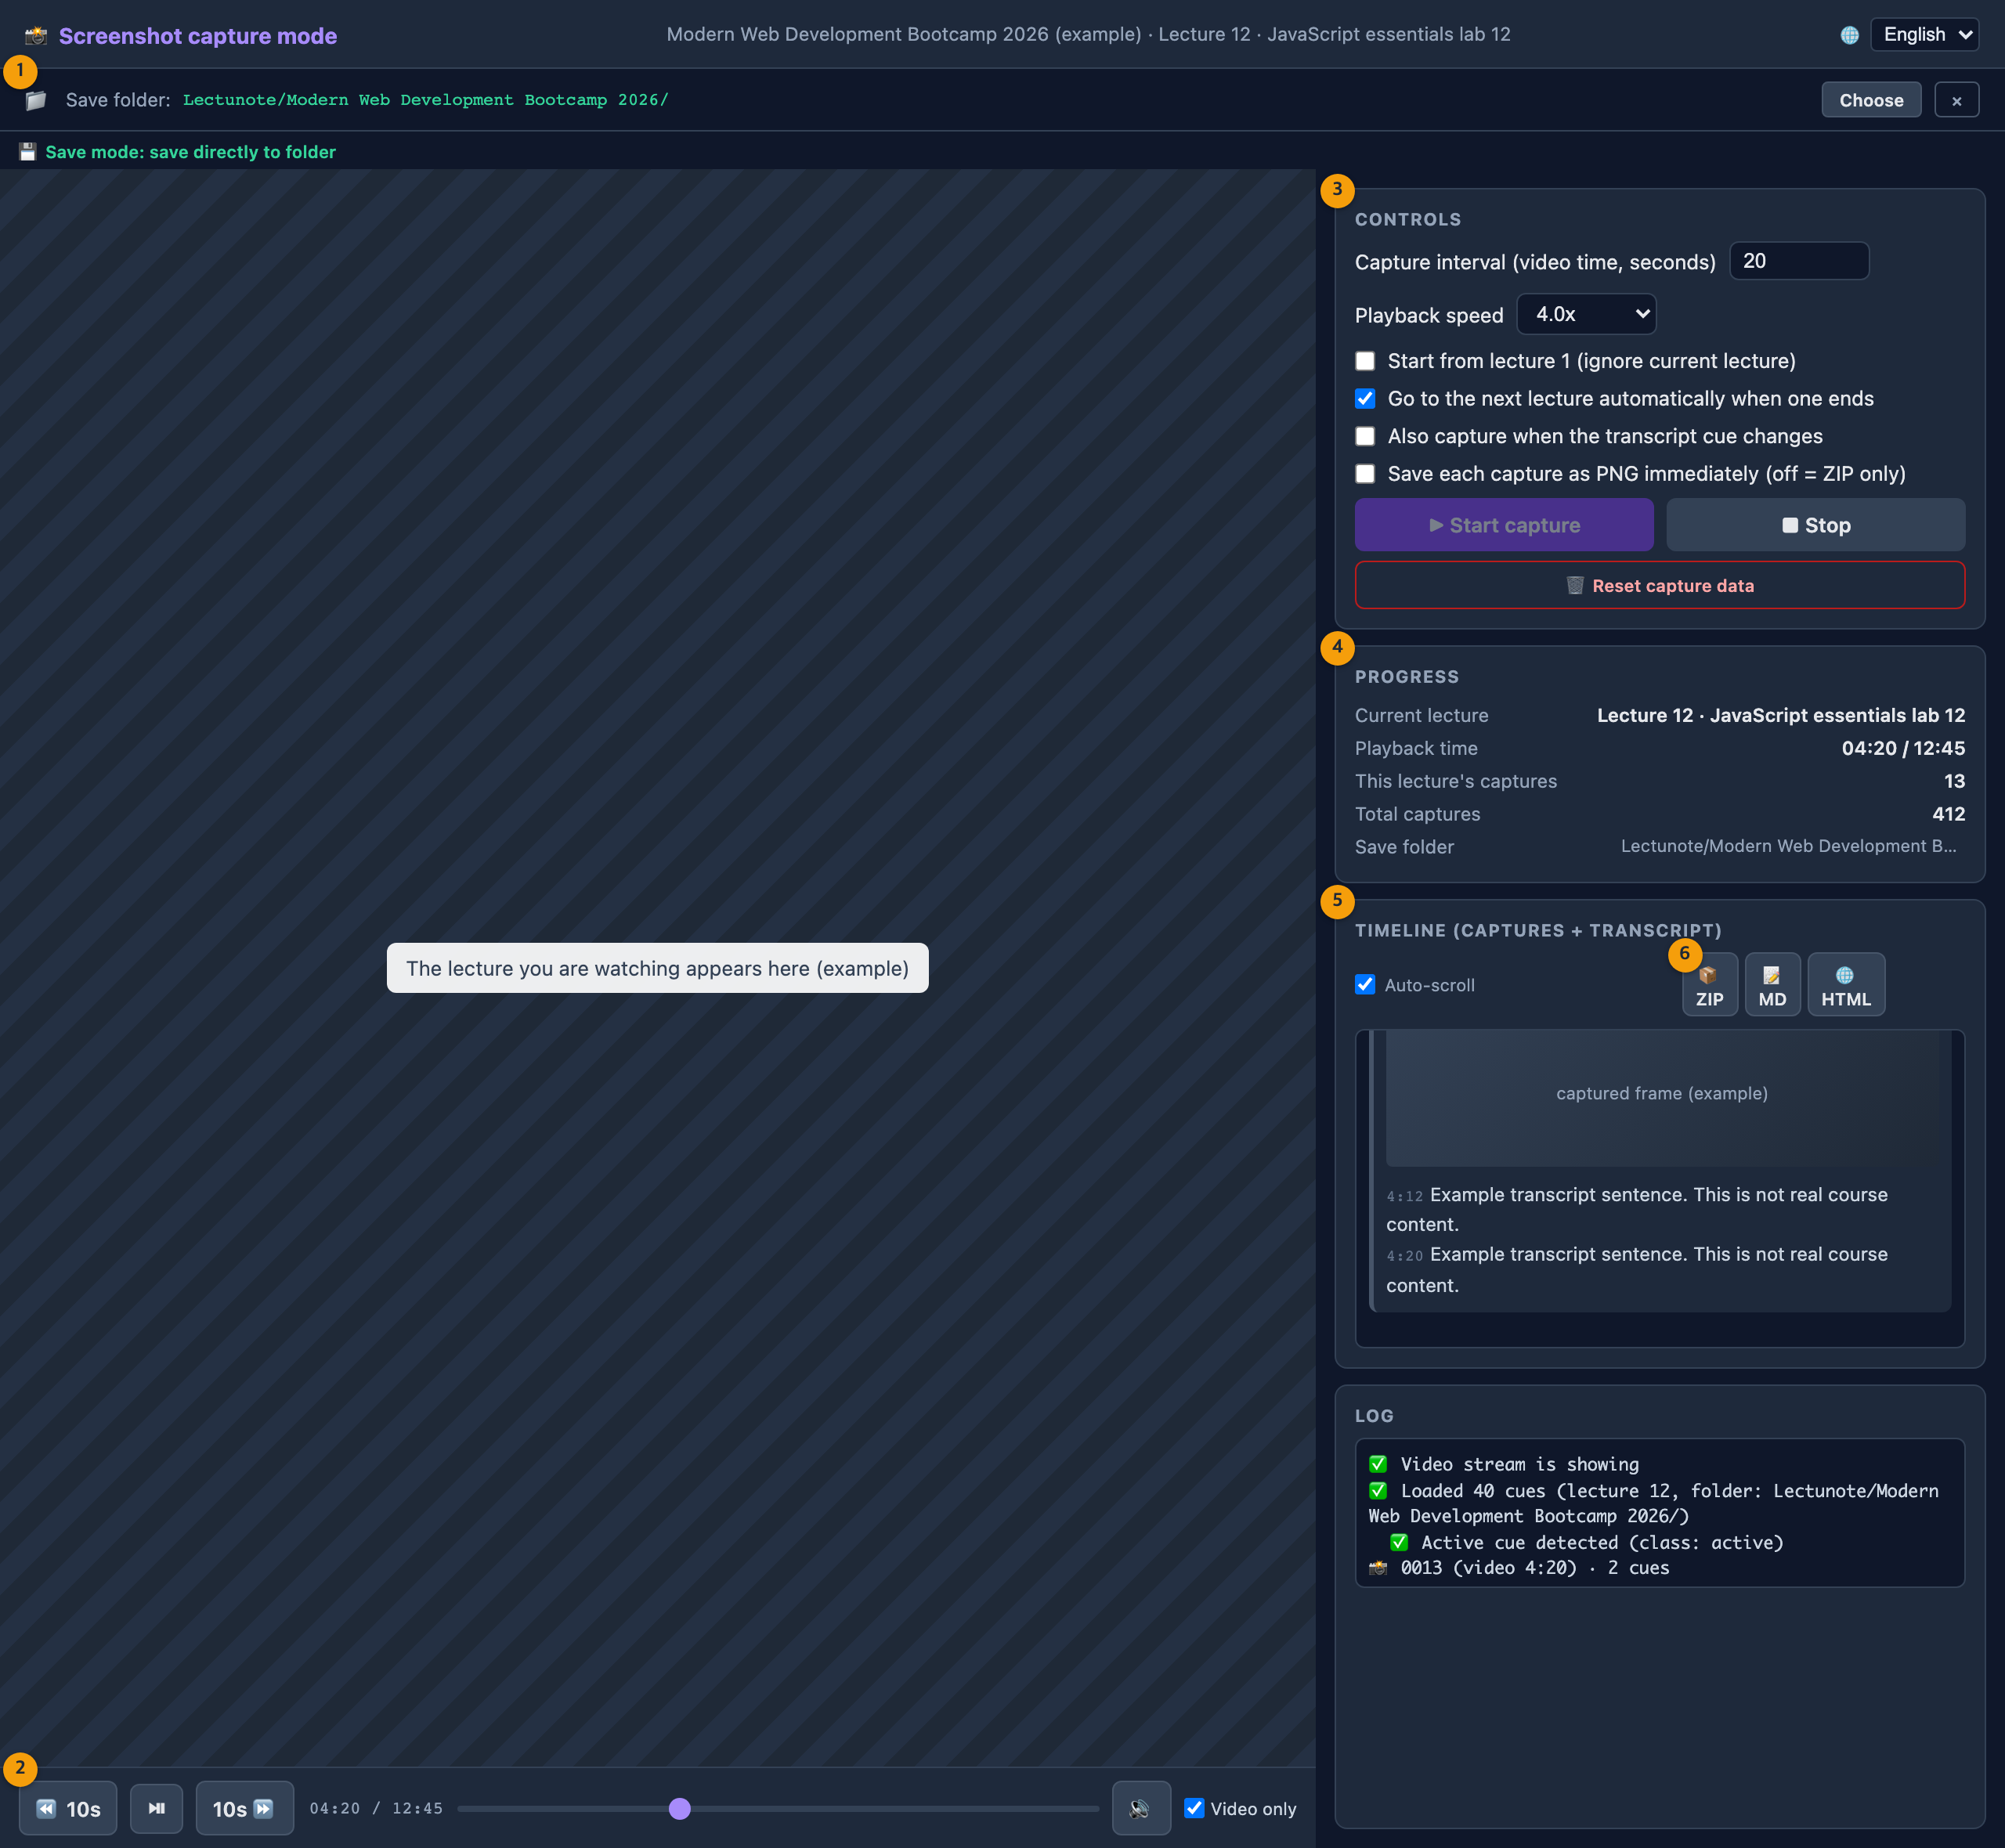
- 1Save folder — 'Choose' a folder on your PC and PNGs are saved straight into per-course/per-lecture folders. Without one, captures stay in memory only and must be exported as a ZIP.
- 2Playback controls — skip 10 s, play/pause, mute. With 'Video only' on, only the video area is captured, without the sidebar or transcript.
- 3Controls — capture interval (seconds of video time), playback speed (4× by default), start from lecture 1, go to the next lecture automatically, extra capture when the transcript cue changes, save PNG immediately. '▶ Start capture' begins and '■ Stop' ends.
- 4Progress — current lecture, playback time, captures in this lecture and in total, save folder
- 5Timeline — each capture adds its number, video time, image, and the transcript for that span
- 6Export — ZIP (Markdown + HTML + PNGs in one, recommended), MD (for Obsidian/Notion), HTML (a single file with images embedded)
7. Export — transcripts and captures
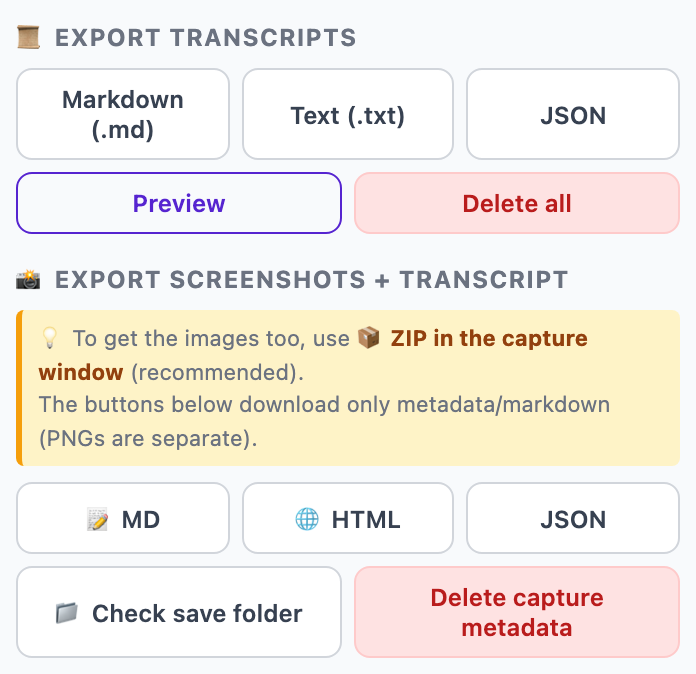
Collected notes are exported to files directly from the popup. Files go to Chrome's Downloads folder, which opens once the save finishes.
- Export transcripts — Markdown (.md): the whole course in one file with section and lecture headings and time labels. Text (.txt): plain body text. JSON: the raw structure for other tools.
- Preview — check the content inside the popup before exporting. Delete all — removes every collected result from browser storage (files already downloaded are kept).
- Export screenshots + transcript — to get the images too, use 📦 ZIP in the capture window. The popup's MD/HTML/JSON buttons download only metadata and Markdown; PNGs are separate. 'Check save folder' shows where the PNGs actually are.
- Image paths in the Markdown are relative to the same folder, so they render as-is in Obsidian, Notion and GitHub.
8. AI notes
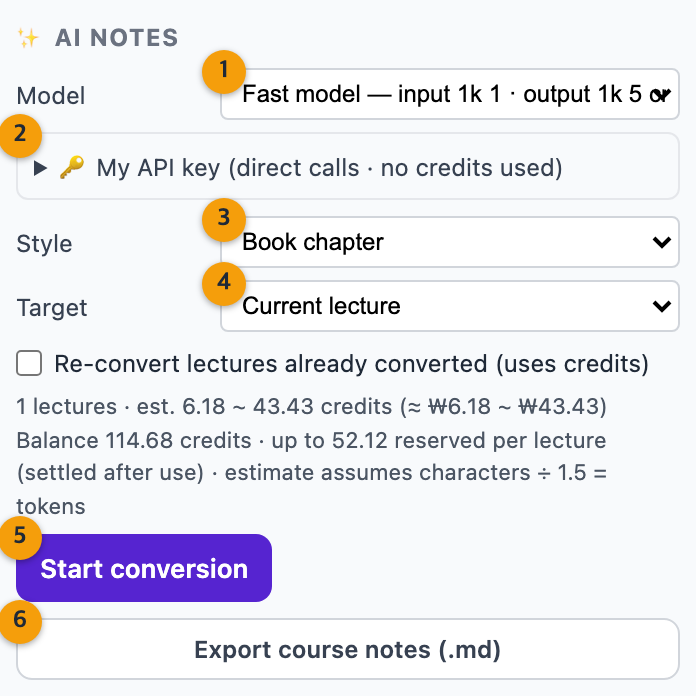
AI turns your collected notes into review material. Pick a model, style and target, press 'Start conversion', and each lecture is converted in turn; results are kept in the browser until you download them as one file (.md) with 'Export course notes'.
- Credits are settled on actual usage (tokens). The estimate is reserved when a conversion starts and the difference is returned when it finishes.
- Lectures already converted are skipped by default. Turn on 'Re-convert lectures already converted' to redo them.
- If credits run out mid-way the job pauses. Top up, press 'Start conversion' again, and it continues from the remaining lectures.
- 1Model — choose between server models (the credit price per 1k input/output tokens is shown next to the name) and any of your own API-key models
- 2My API key — call providers directly with your own key (see 9 below)
- 3Style — Book chapter (long explanatory prose) or Summary notes (key points)
- 4Target — current lecture / all collected lectures / a custom range (e.g. 71,72-75)
- 5Start conversion — the estimated credits are shown before you press it. While running, a progress bar and a 'Stop' button appear
- 6Export course notes — the converted lectures as a single Markdown file. Exported notes can be removed with 'Clean up notes' to free space
9. My API key (direct calls)
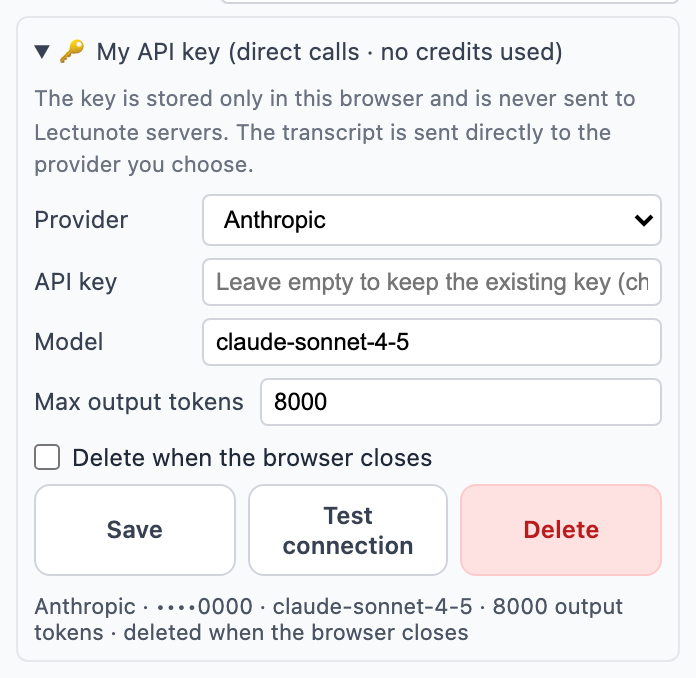
Register your own OpenAI, Anthropic, Gemini or xAI API key and the extension calls that provider directly with no credits used. The key is stored only in this browser and is never sent to Lectunote servers.
- Enter the provider, key and model name and press 'Save'; Chrome then asks once for permission to access that provider's address. Calls work only after you approve it.
- Use 'Test connection' to confirm the key works, then pick it from the 'My API key' group in the model list to convert.
- With 'Delete when the browser closes' on, the key is kept only for the session. 'Delete' removes the key and releases the permission with it.
- Leave 'Max output tokens' empty to use the model default; raise it if long lectures come back truncated.
10. AI notes sync (optional)
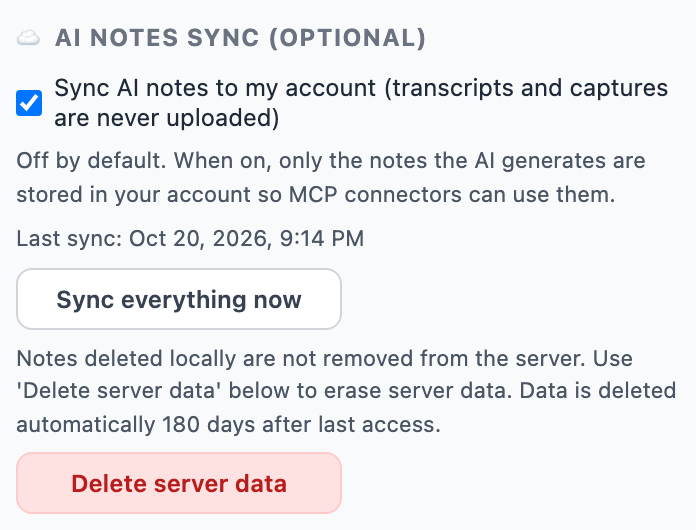
Off by default. When on, only the study notes generated by AI are stored in your own account so AI connectors such as MCP can read them. Lecture transcripts and captures (images and metadata) are never uploaded under any setting; they stay on your computer. Nobody else can see your notes.
- 'Sync everything now' uploads the notes you already have; after that, each note is uploaded automatically when its AI conversion finishes, and failures are retried periodically.
- Cleaning up notes locally does not remove the server copy. 'Delete server data' erases everything on the server, and data is deleted automatically 180 days after your last access.
- When you turn sync off, you are asked whether to delete the server data as well.
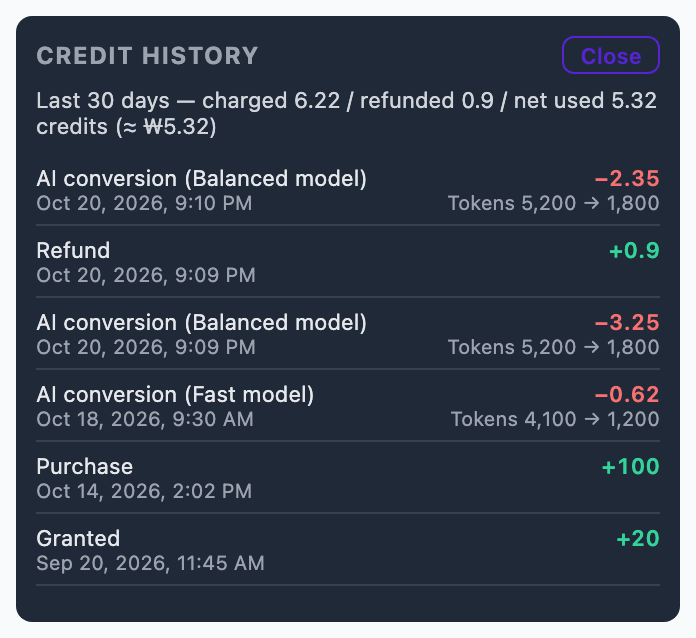
11. Account bar and credit history
Click the credit number at the top of the popup to open a 30-day usage summary and the transaction list. 'Top up' goes to the pricing page; 'Sign out' ends the session in this browser only.
- AI conversions show the model and the input/output token counts. If actual usage is below the reserved amount, the difference comes back as a 'Refund'.
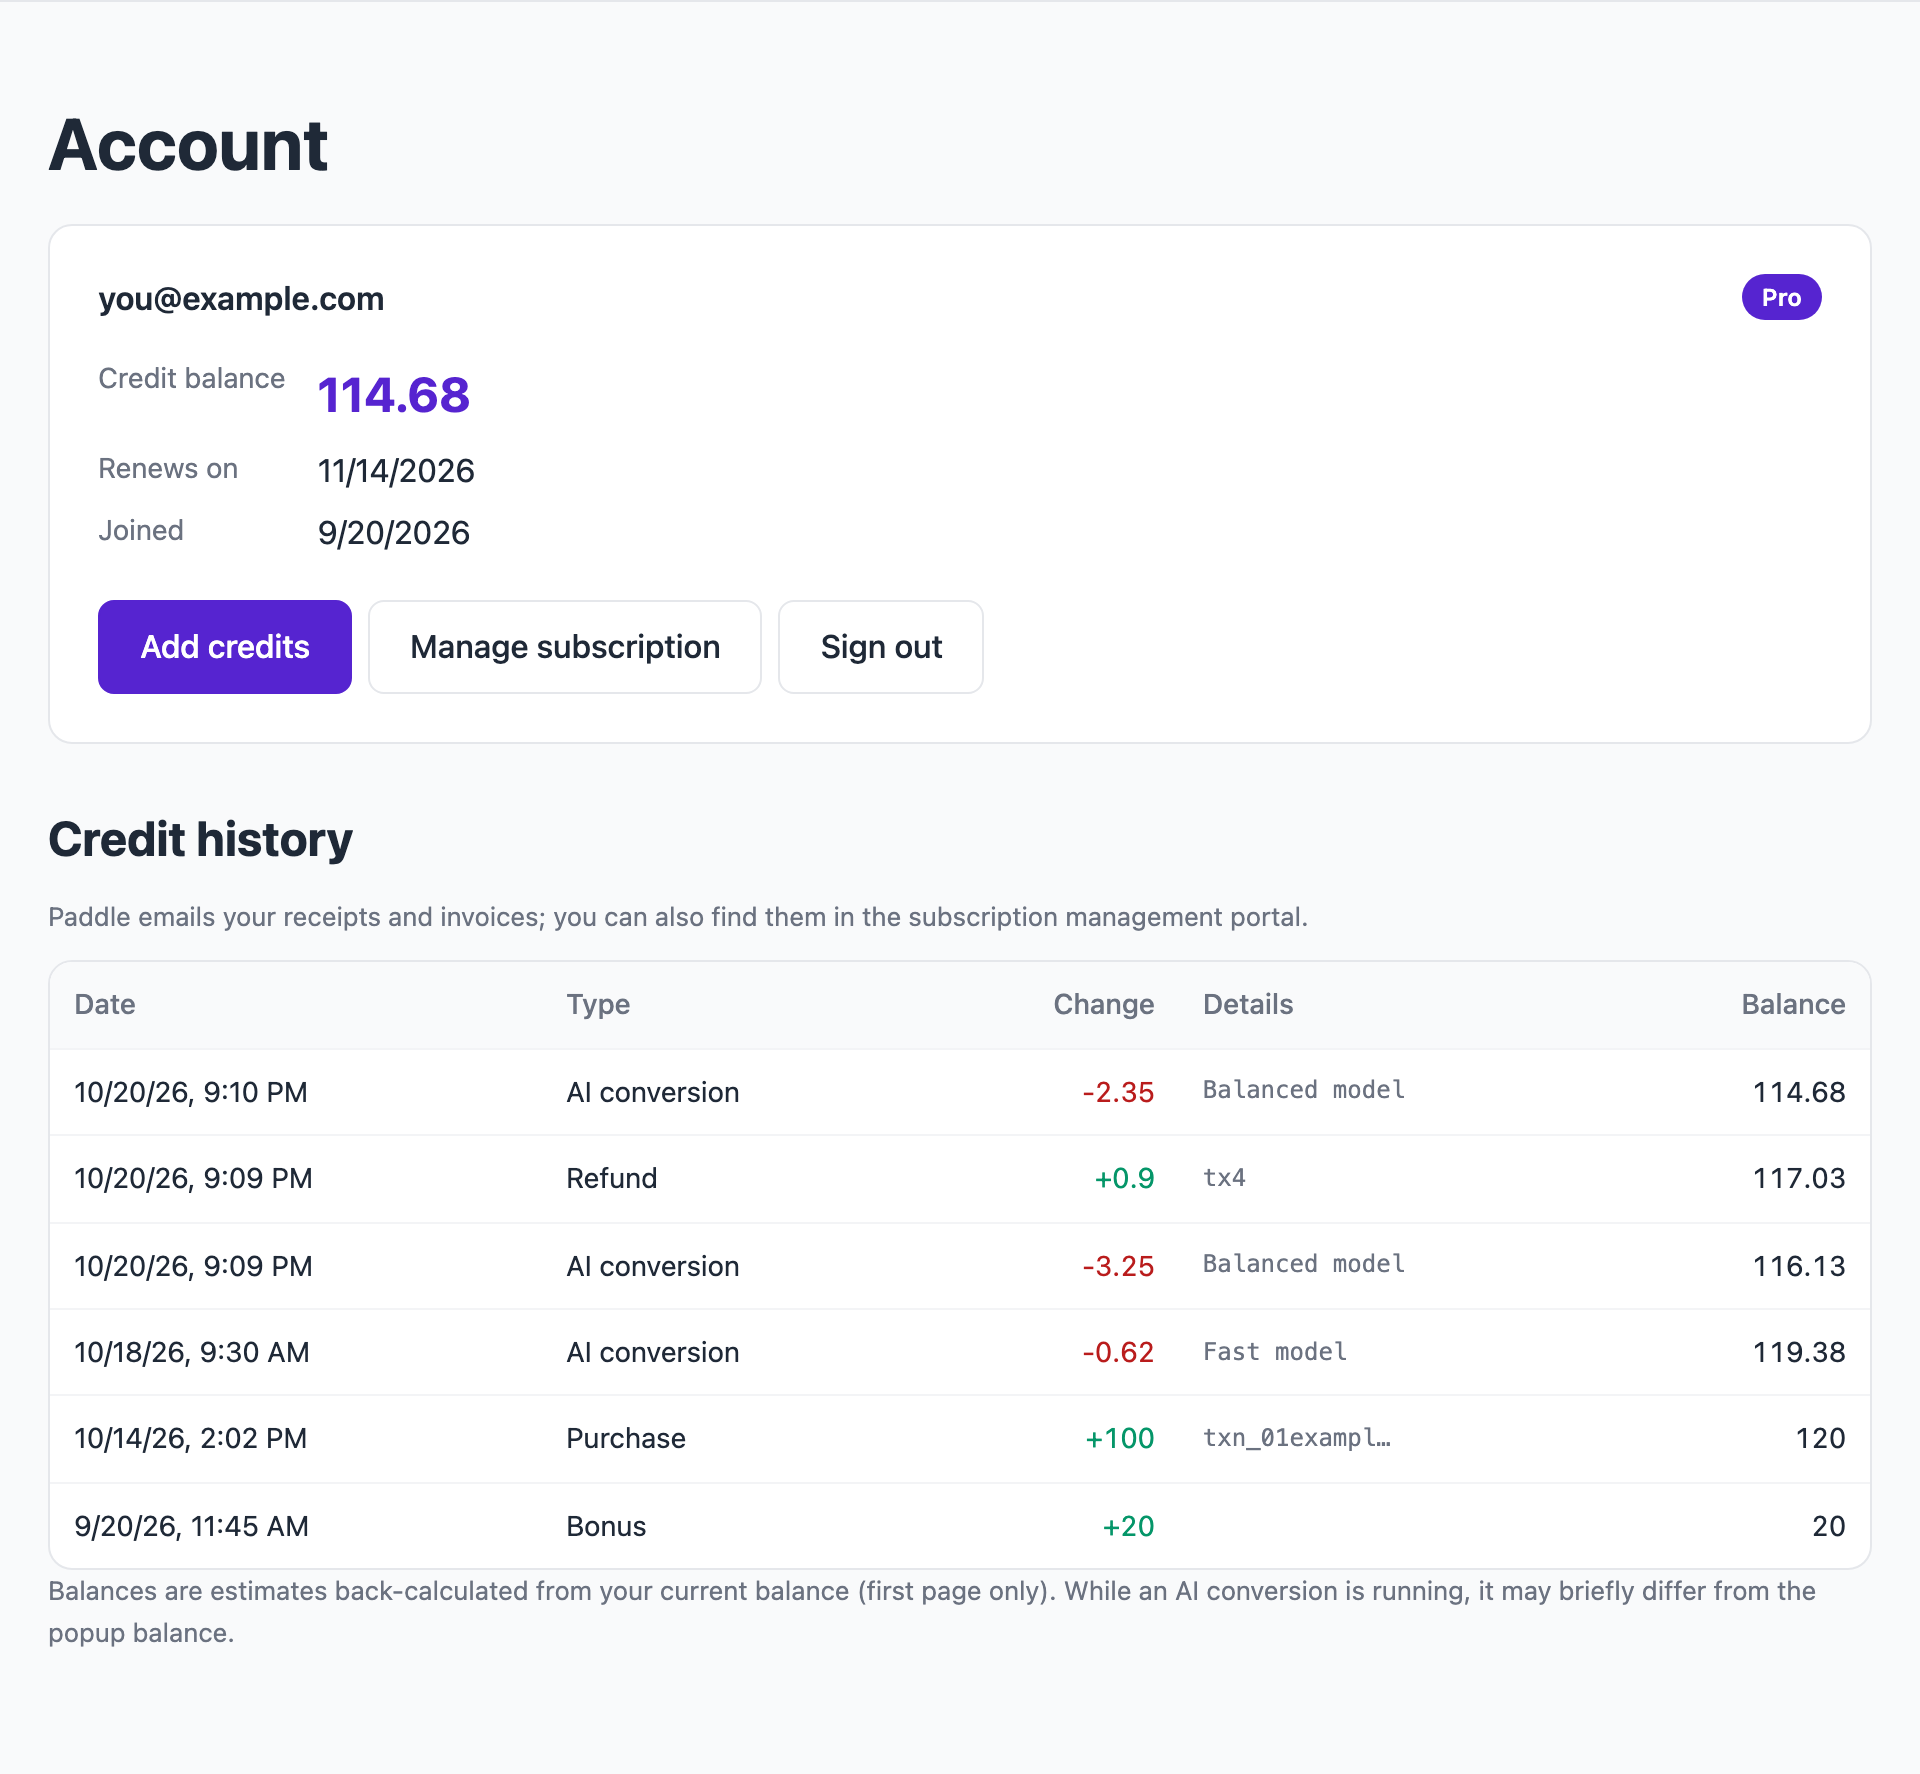
- The same history, together with your balance, is available on the web account page (13 below).
12. Language
Use 🌐 Language at the bottom of the popup to choose Auto (browser language), Korean or English. It applies immediately to the popup and the capture window. The website language is switched separately with the language links at the top of each page.

13. Web account page
Sign in with the same Google account under 'Account' on lectunote.com to see your credit balance, plan and renewal date, and the full transaction history. 'Add credits' goes to the pricing page, and Pro subscribers use 'Manage subscription' to change the payment method or cancel (payments are handled by Paddle, which also emails your receipts).
Where your data is stored
- Study notes: by default only on your computer (browser storage and the folder you choose).
- AI notes sync (optional): only if you turn it on, the text of AI-generated notes is stored in your private account; you can delete all of it from the popup at any time, and it is deleted automatically 180 days after your last access. Lecture transcripts and captures are never synced.
- AI conversion: only the text of the notes you choose to convert is sent to the AI provider. Video and captured images are never sent anywhere.
- Lectunote servers keep only account data, credit usage records and error diagnostics. See the Privacy Policy for details. →
Personal-use rules
- Use Lectunote only for your own learning, on courses you are enrolled in.
- Do not share, publish, redistribute or sell your notes or AI output.
- You are responsible for complying with Udemy's Terms of Use; Lectunote does not host, sell or distribute course content. →
FAQ
- Does it download course videos?
- No. It never downloads video files or stores them on a server. Notes are built from the text shown on the lecture page.
- Can I share my notes with a friend?
- No. Lectunote is for personal study only; sharing and redistribution are prohibited by the Terms of Service.
- What does it cost?
- The extension is free. Only AI study notes use credits, which you top up with a Pro subscription or a credit pack. See the pricing page for details. →
- The capture shows a black screen.
- That lecture enforces DRM (Widevine L1). Lectunote does not bypass it; transcript collection and AI notes still work as usual.
- A lecture was saved as number 0.
- The current lecture could not be located in the sidebar. Click 'Collect current lecture' again from that lecture's page to overwrite it; if it keeps happening, run 'Curriculum diagnostics' to check detection.